.png)
Folder Settings (Reporting)
IN THIS ARTICLE
- Introduction
- Add a Folder Category
- Add a Folder Type
- Edit Folder Details
- Customize Report Cover Page
- Assign Teams
- Add Default Forms
- Insert Dates on a Cover Page
- Show Resolutions on a Report
- Show Folder Reference Fields on Report
Introduction
Different workflows in InspectAll can be handled very efficiently by customizing your Folder Settings.
We suggest setting up a different folder type for each workflow. Folder types are not only a searchable "tag" in InspectAll, but also allow you to set up different report parameters for your Folder Report based on the type. In that way, you can change your folder type and change the report format.
Think about the type of work you do, and the frequency with which you do it, as well as how you will be presenting the final report internally or to your customer. That will determine how you label your Folder Types.
For example, if you plan to manage a Quality and Safety process in InspectAll, you may choose to organize your folders in the following manner:
- Quality (Folder Category)
- Quality Assurance Checks (Folder Type)
- Quality Control Measures (Folder Type)
- Safety (Folder Category)
- Hazard Assessments (Folder Type)
- Inspections (Folder Type)
- Accident Investigation (Folder Type)
If you are doing inspections as a service, as an example, you may choose to set up your folder types as follows:

Folders can be setup with the following characteristics:
- Name & Color: Adds a name and color to every folder.
- Default Report: the report template that will be used on the printed folder report.
- Calculated Folder IDs: Setup a prefix and counter to add an id to each new folder automatically.
- Default Forms: create a workflow of forms for the folders by automatically adding forms to every new folder.
- Permissions: restrict teams from viewing particular folder types.
- Priority Levels: Choose which questions show on your folder report output.
Add a new Folder Category
- From the InspectAll website, click your name (at the top right of the page) and select "Folder Settings" from the drop down menu.

- Click the green "Add Folder Type" button.

- Click "Add Category"

- Give your folder category a name and click on "Create Category"

Add a Folder Type
- From the InspectAll website, click your name (at the top right of the page) and select "Folder Settings" from the drop down menu.
- Click the green "Add Folder Type" button.
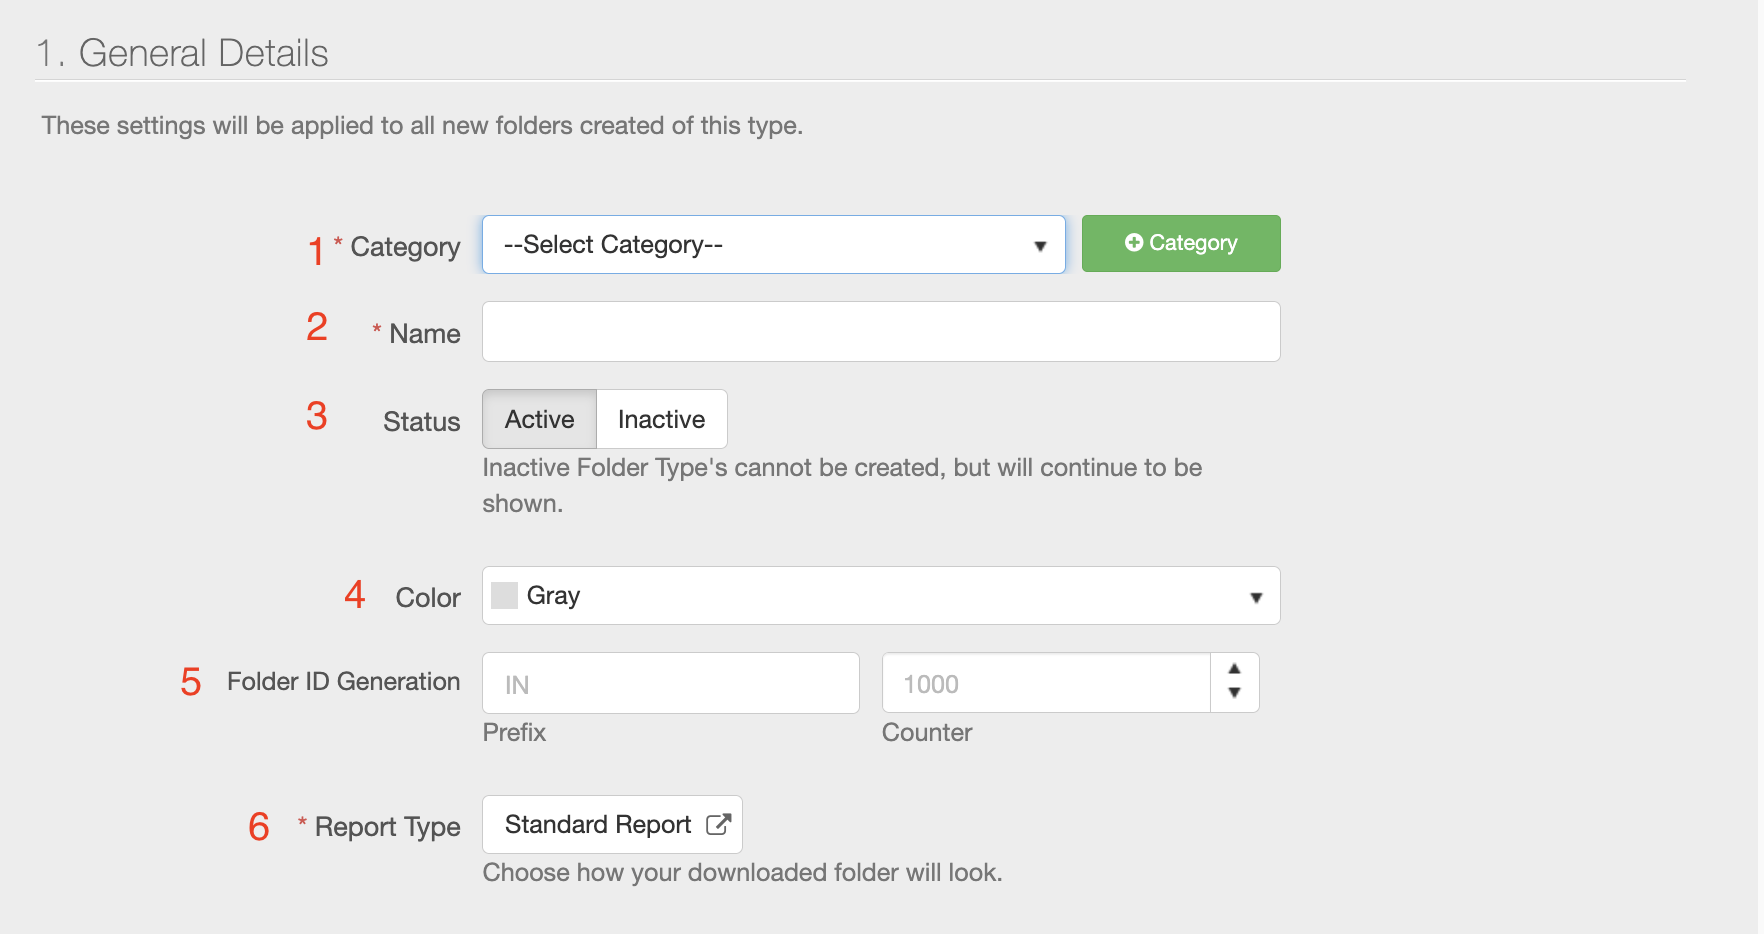
General Details
- Select the Category from the drop down
- Name your Folder Type
- Active is the default status. If you want the folder type to be created but not accessible to create new folders of this type, set it to "Inactive"
- Color: This determines the color associated with the Folder type (on your folder tab and calendar and serves as just a visual aid).
- Folder ID Generation will determine what prefix and counter is applied to your automatically generated FOLDER ID for this type of folder only.
- Report Type: The standard folder report type is the default. If you want to select a different report for the default for this type, you can select it here. More on the Report Types available in InspectAll can be found HERE
Note: Reporting options for custom reports are not sometimes not editable from the user interface. You can check this options by following the instructions found HERE.
Report Options
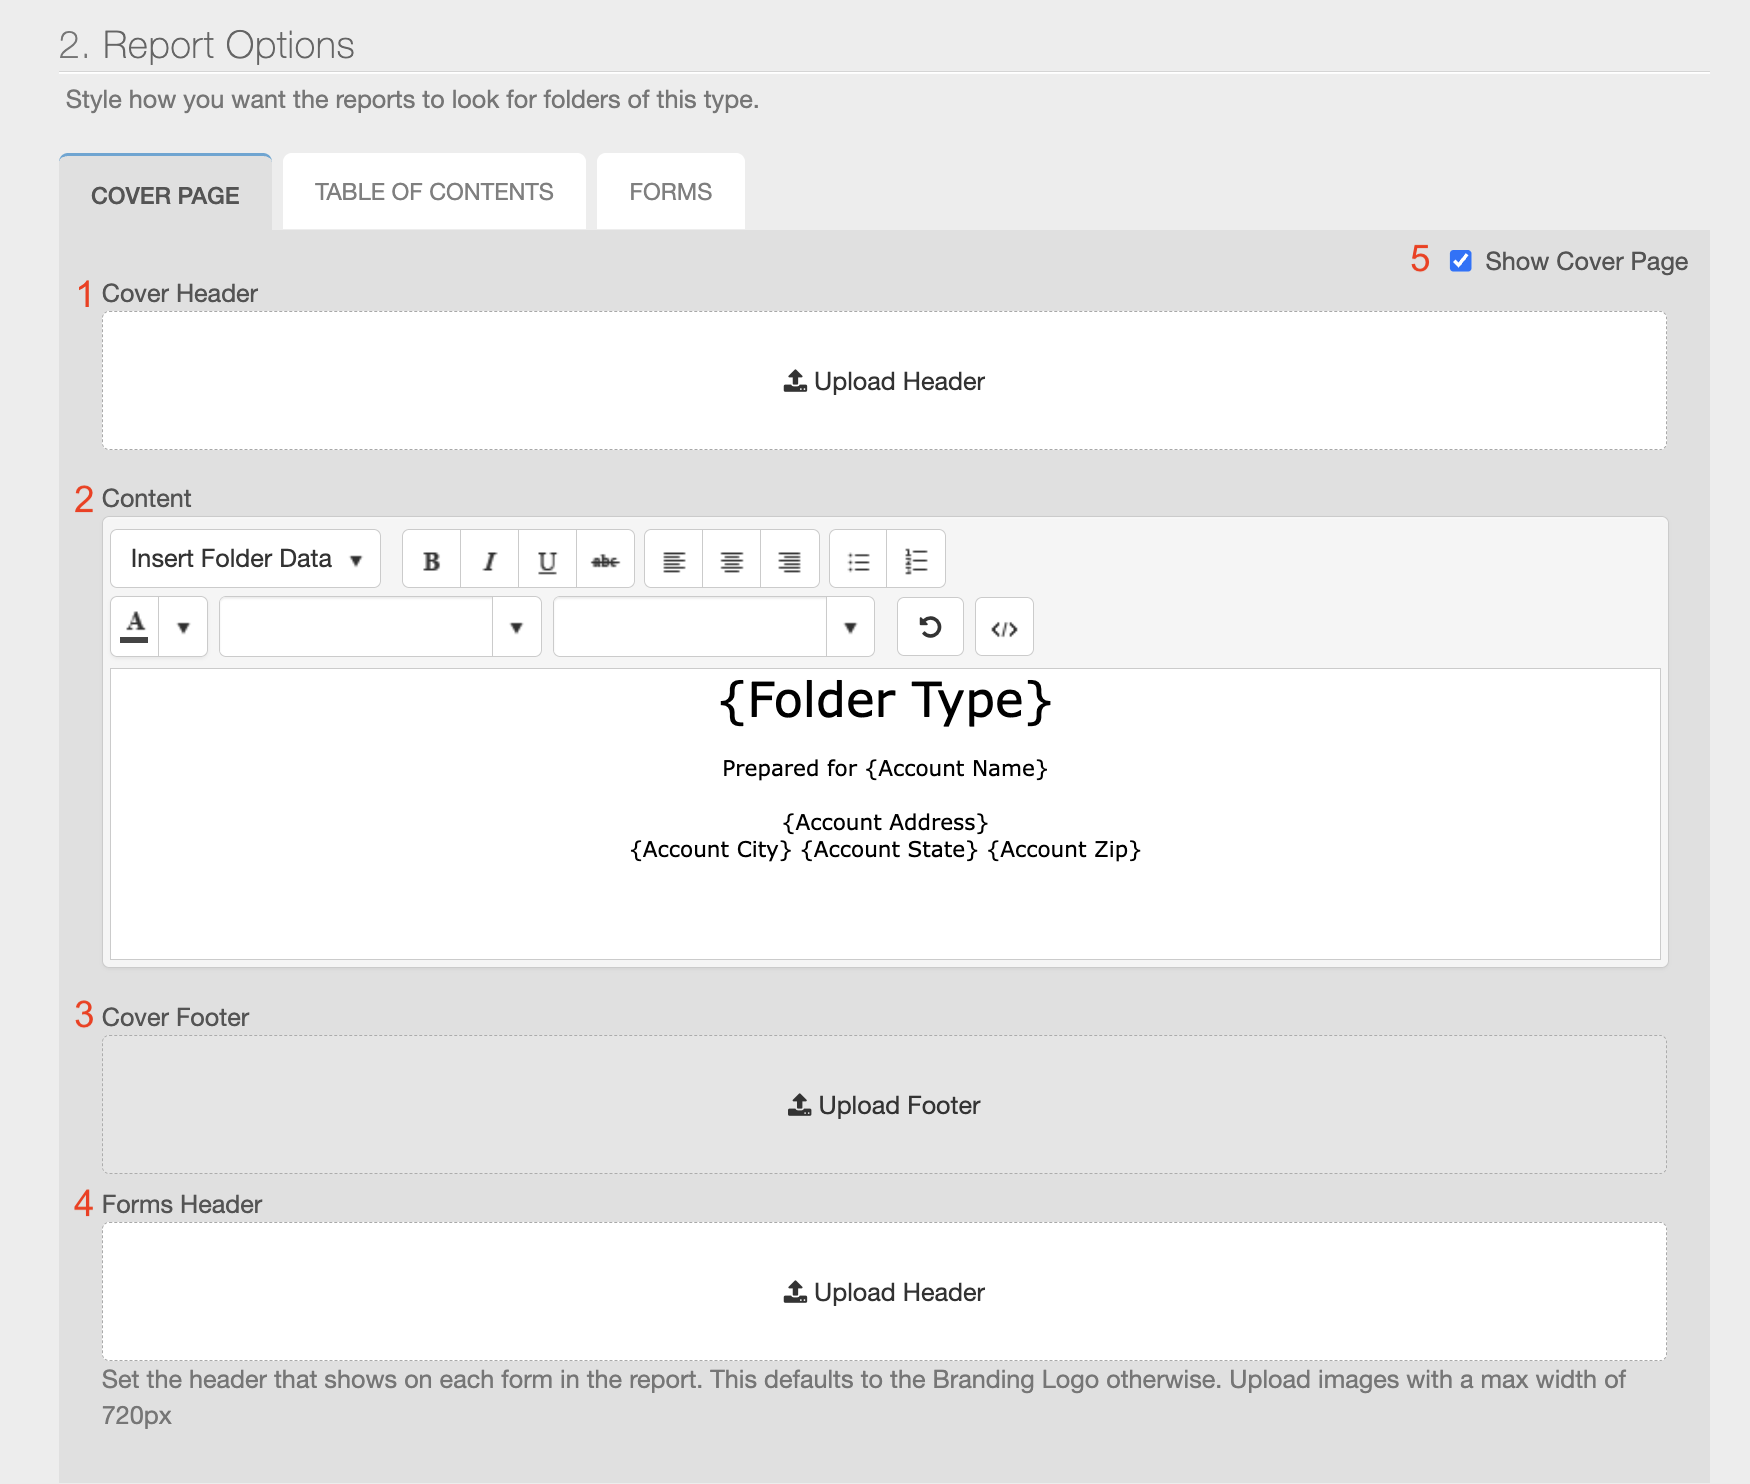
The selections you choose in Report Options will dictate what populates on your Folder Report when you download it for a folder of this type.
1. Cover Header: This section is where you will upload your coversheet logo image file.
- Click "Upload Header" to select a file containing a custom header image. If there is already an image in the Header Section, first delete the image by clicking on the red delete icon, then click on "upload header" to add a new image. File types supported are .jpg, .jpeg, .png, .gif, and .bmp. This logo can be different for each folder type, or you can use the same logo on all Folder Types. This image file should be larger to cover the width of a standard piece of paper. Think about 7.5-8" (about 720 pixels). The cover page logo will automatically left align.
- Content:
- Use the Tool Bar in the content section to update font styles, or add information to be automatically pulled from the Folder details.
- Click "Insert Folder Data" to add information fields to your cover page.
- You can insert any information from the drop down list that will automatically populate on the cover sheet of your report. This information will show up in brackets on the cover sheet content section in Folder Settings. { } Any text outside of the brackets will be static.
- For Dates, you can insert the Date Created or Date Closed (which will be based on when the folder was created or closed). Or if you want the cover sheet to show the date the report was printed, enter "@Month/@Day/@Year". Completed dates will show up on FORMS automatically. More details on folder report date options can be found HERE.
- "Folder Type" will pull the Name of the Folder Type into your report. So, for instance, if you are doing an Annual Inspection Folder type, that is the information that will show up where you insert the Folder Type data.
- If you want to be able to manually add information on the cover sheet, use the "Description" field. The description field pulls any information you enter in the Folder Description on a folder (from the website or mobile app).
- Edit font style, alignment, and size.
- Click on the text box to edit the fields.
- Cover Footer: This section is where you will upload your coversheet logo image file that will show up at the bottom of the cover sheet page.
- Click "Upload Footer" to select a file containing a custom header image. If there is already an image in the Footer Section, first delete the image by clicking on the red delete icon, then click on "upload footer" to add a new image.
- Forms Header: If you add a logo image here, it will override the report branding image set up for your account for this folder type. This logo should be a small file, and will show up on the pages after the cover sheet at the top in the Header section. You'll want it to be maybe 2-4" wide (about 300 pixels) and about 1-2" tall (about 80 pixels). More details on Alternate Branding can be found HERE.
- Show Cover Page: uncheck this box if you want to omit the cover page for folder reports for this folder type.
Assign Teams
You can assign a Folder Type to a Team within the Folder Setting menu.
If a folder type is assigned to a Team, any web or mobile user with Create Permissions that is assigned to the Team you select is able to initiate a new folder of this type. If you assign the Folder Type to the "All Users" team, then any user has access to create a folder of this type when scheduling a new folder or changing a folder type.
Read More about Team Set up HERE.

Default Forms
Non-Asset tracking form templates can be set up as a default by Folder Type. This function will automatically populate the form template(s) you choose here whenever a folder of this type is created.
For instance, if you have a time sheet or internal notes form you want to have automatically show up without selecting it, add that form here.

Note: Asset tracking forms can NOT be set up as defaults. More details on Asset tracking versus Non-asset tracking forms can be found HERE
Table of Contents
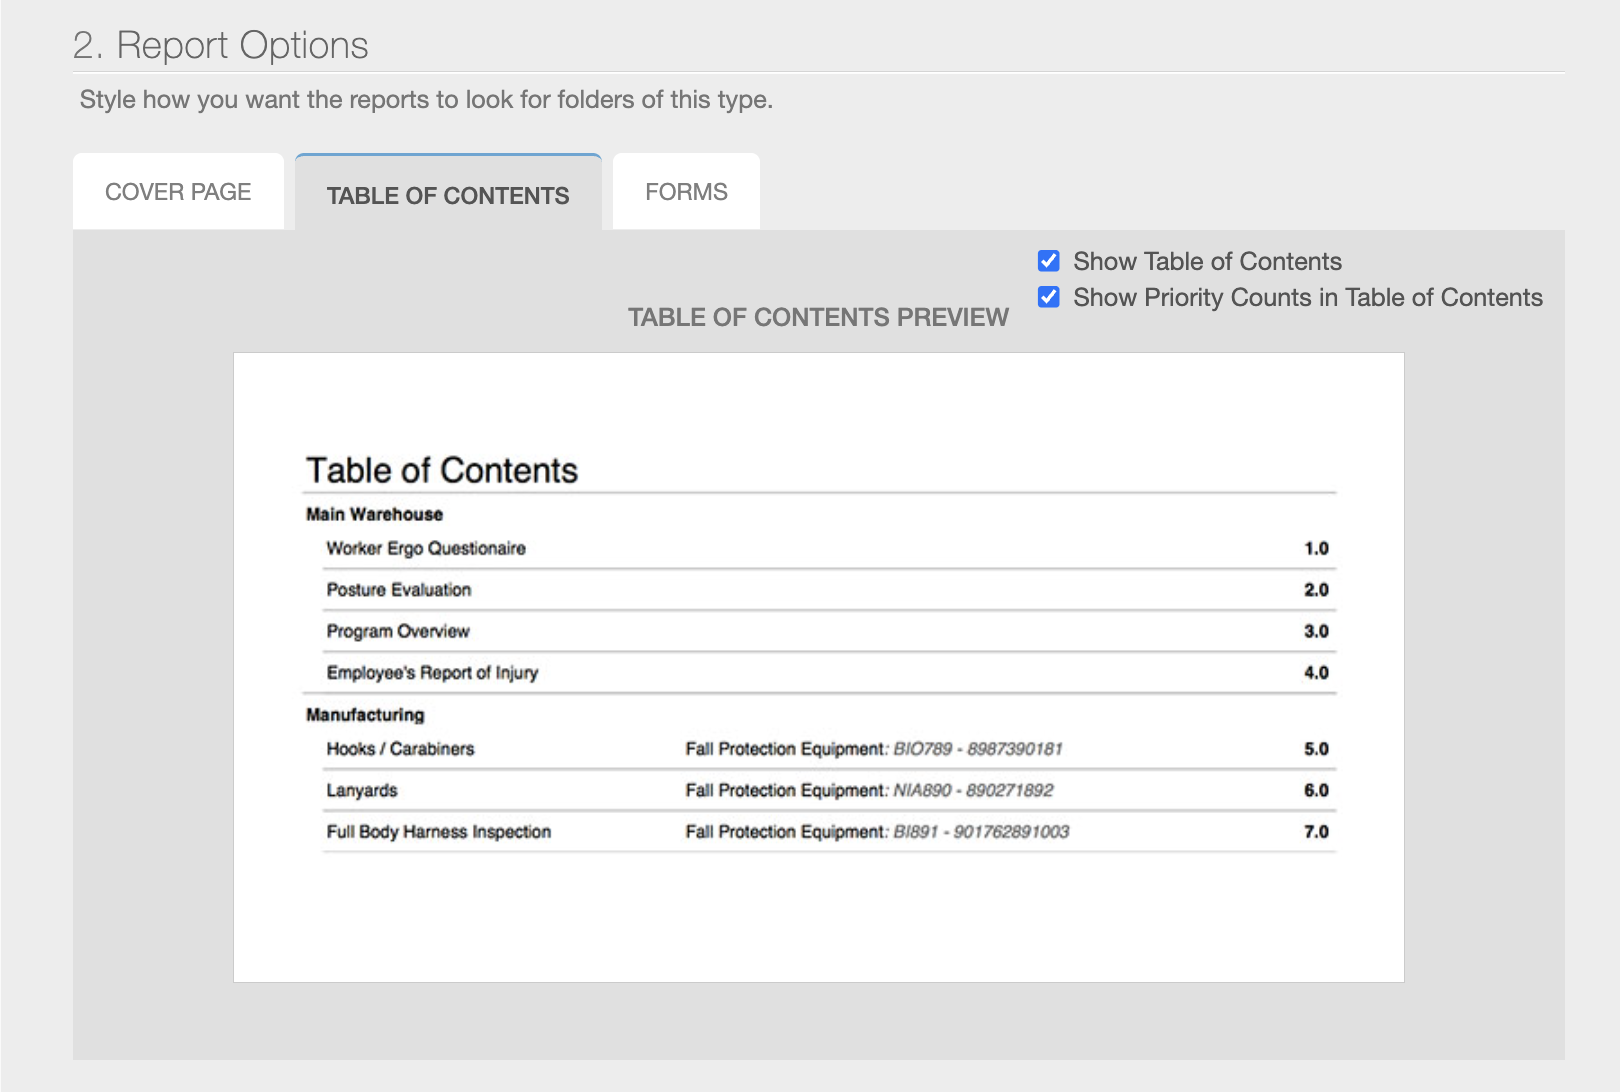
Show or Hide Table of Contents
- .Click The Table Of Contents tab under 2. Report Options.
- Click the check box to show/hide table of contents. *When table of contents is hidden, "Hidden" will display on the Table of Contents tab.
- Click the check box to show/hide the Priority Counts in the Table of contents. Priority counts will detail the number of low, medium, and high priorities found for each of the forms in the folder.
-
Click "Create" or "Update" to save.

Forms
Click on the "Forms" tab under "General Details" .
- Form Options
- Select the options that control how forms are shown within the report.
Show/HidePage break between each form.Show/HideIncomplete forms.Show/HideSummary of priorities found on the form.Show/HideSummary of any scores calculated on the form.Show/HideResolutions. If you mark a priority as "Resolved", showing the resolutions will show that information on the folder report. You will see a green text "Resolved" as well as the comments entered in the Resolution field on the report. More details HERE- Show Top N Attributes: Enter a number to determine how many attributes of a class will show on the report. For example, if you enter 5, then the first 5 attributes that are filled in on an asset will show on the report. More on setting up attributes HERE.
- Priorities Shown
- Select the priorities you would like to show on report output. For instance, if you want to exclude questions answered with an "n/a" priority level, select the "High, Medium, Low, Good" option in this section.
- Click "Create" or "Update" to save.

Delete A Folder Type (or Make it Inactive)

If you have a folder type that was in use but you no longer want it to show up when scheduling a new folder, you can make it "Inactive." Just click the blue pencil icon beside the folder type and change the status to "Inactive" then save your updates.
An inactive folder type cannot be created, but will continue to be shown for any previously created folders under that type.

Insert Dates on a Folder Cover Page
Because forms in a folder can all be marked complete on different dates, the date options for a Folder Report cover page are Date Created, Date Closed, and Date the report was downloaded.
If you want to enter alternate date information, you can use another field such as a Folder Note reference field to manually enter another date and add that on your Folder Report cover page.
Date Created (date the folder was created).
In the "Content" section of the Cover Sheet options in Folder Settings, select "Date Created" from the drop down menu.

Date Created (date the folder was marked CLOSED).
In the "Content" section of the Cover Sheet options in Folder Settings, select "Date Closed" from the drop down menu.

Date the Folder Report is downloaded
Enter the following text on the cover sheet to show the date you download the report.
@Month/@Day/@Year
Use Folder Reference Fields to enter a manually entered Alternate Date
Folder Notes (reference fields) can be set up on your account your selected field titles. Read more about Folder Notes HERE.
In folder settings, use the following text on your cover page of your folder report to include the Folder Reference Fields automatically.
@FolderRef1
@FolderRef2
@FolderRef3